|
|
|
This version of a fresnel shader will do scientifically accurate fresnel shading, as well as performing dispersion functions with a simple technique. Dispersion is the physical effect that makes a rainbow appear when you shine sunlight (or any other multi-spectral light) through a prism. See the sample files and tutorials on the website for this complex function. This shader comes to us courtesy of Alan Stafford. |
|||
 |
|
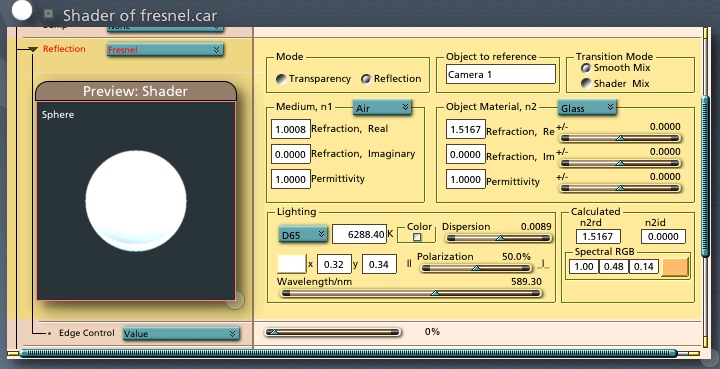
Mode, Transparency and Reflection radio buttons For typical use, this shader would be used in the Transparency and Reflection channels. Click the button for the appropriate channel to automatically get the correct function. (Feel free to experiment too! ;-) Object to reference This is usually going to be your rendering camera, but you may get other effects by referencing other objects here. Transition Mode, Smooth Mix and Shader Mix radio buttons Smooth Mix will cause an even transition of the fresnel effect, as you would see in a perfectly flat surface. By using the Shader Mix and inserting a shader in the Edge Control slot, you can easily add noise or other effects. Medium, n1 The Medium is the object you are shooting rays through. For realistic effects, this will usually be air, although many other picks are available in the presets pull down. Refraction and Permittivity Boxes These boxes will automatically update with any picks made in the presets pulldown. If you have a custom medium that require different values, you may enter them directly. Object Material, n2 The Object is the thing you are shading. Again, the presets pulldown will get you started with some common materials. Refraction and Permittivity Boxes and sliders These boxes will automatically update with any picks made in the presets pulldown. If you have a custom object material that require different values, you may enter them directly. The sliders allow for easy tweaking of the values. They are relative to the value currently in their respective box. The Refraction values are specified in both real and imaginary components. For now, the real component is the only one actually in use. Lighting Box White Point setting pulldown and Illuminant Temperature text box This sets the white point for the light you are shining on your object. The text box shows the actual value. Custom values may be inputted to the text box. Used for dispersion. Color checkbox In the transparency channel checking this box will return the color indicated by the Wavelength slider. This can be used as part of automating the dispersion function by animating the Wavelength slider and then summing the resulting pictures. (The object will be colored in a shifting manner as the refractive index shifts, such that the light passing through will be colored, and each color will be refracted slightly differently) Dispersion Slider This value is set when a preset material is chosen. Dispersion controls how strongly the colors separate when multi-spectral light is used. To exagerate the effect, use large values. Color Chip The color chip reports the average color of the light chosen by the White Point pulldown or the Illuminant Temperature text box. It may be opened to extract the color values, but it is output only. x and y These are the CIE 1931 coordinates of the white point for the selected Illuminant Temperature. Output only. Polarization Slider Controls the polarization of the lighting. 50% is normal. You can change the blend between reflection and transparency by moving the slider between the || (parallel) and _|_ (perpendicular) settings. This has the same effect as moving a light, without really moving it. Wavelength Slider This slider has two functions, both related to dispersion. In order to use the Color checkbox function, it should be animated starting at the left at frame 0 and going all the way to the right at the last frame. This causes the object color to be shifted frame by frame. The secondary function is to determine the Refraction values. Again, for the dispersion animation, when the slider is all the way to the left (first frame), look at the calculated n2 values, and copy them up to the Object Material boxes. Move the scrubber to the last frame, move the Wavelength all the way to the right, and copy the values up again. Now the index of refraction will shift as the color shifts. By compositing the resulting frames together, a correct dispersion effect is achieved. Calculated box n2rd and n2id These are the refraction values calculated by changing the Wavelength slider in the Lighting box. They are copied up to the Re and Im boxes in the Object material box in order to do dispersion renders. Spectral RGB This gives the output of the Wavelength slider as a color and as RGB values, if you wish to use an animated colored light instead of using the Color checkbox and coloring the object. |
|
[Shoestring Graphics] [Shoestring Shaders] [Details] [Samples] [Download] [Shoestring Toolbox] [Gallery] [Links] [Privacy & Contact] [Tutorials] [Other Stuff] |